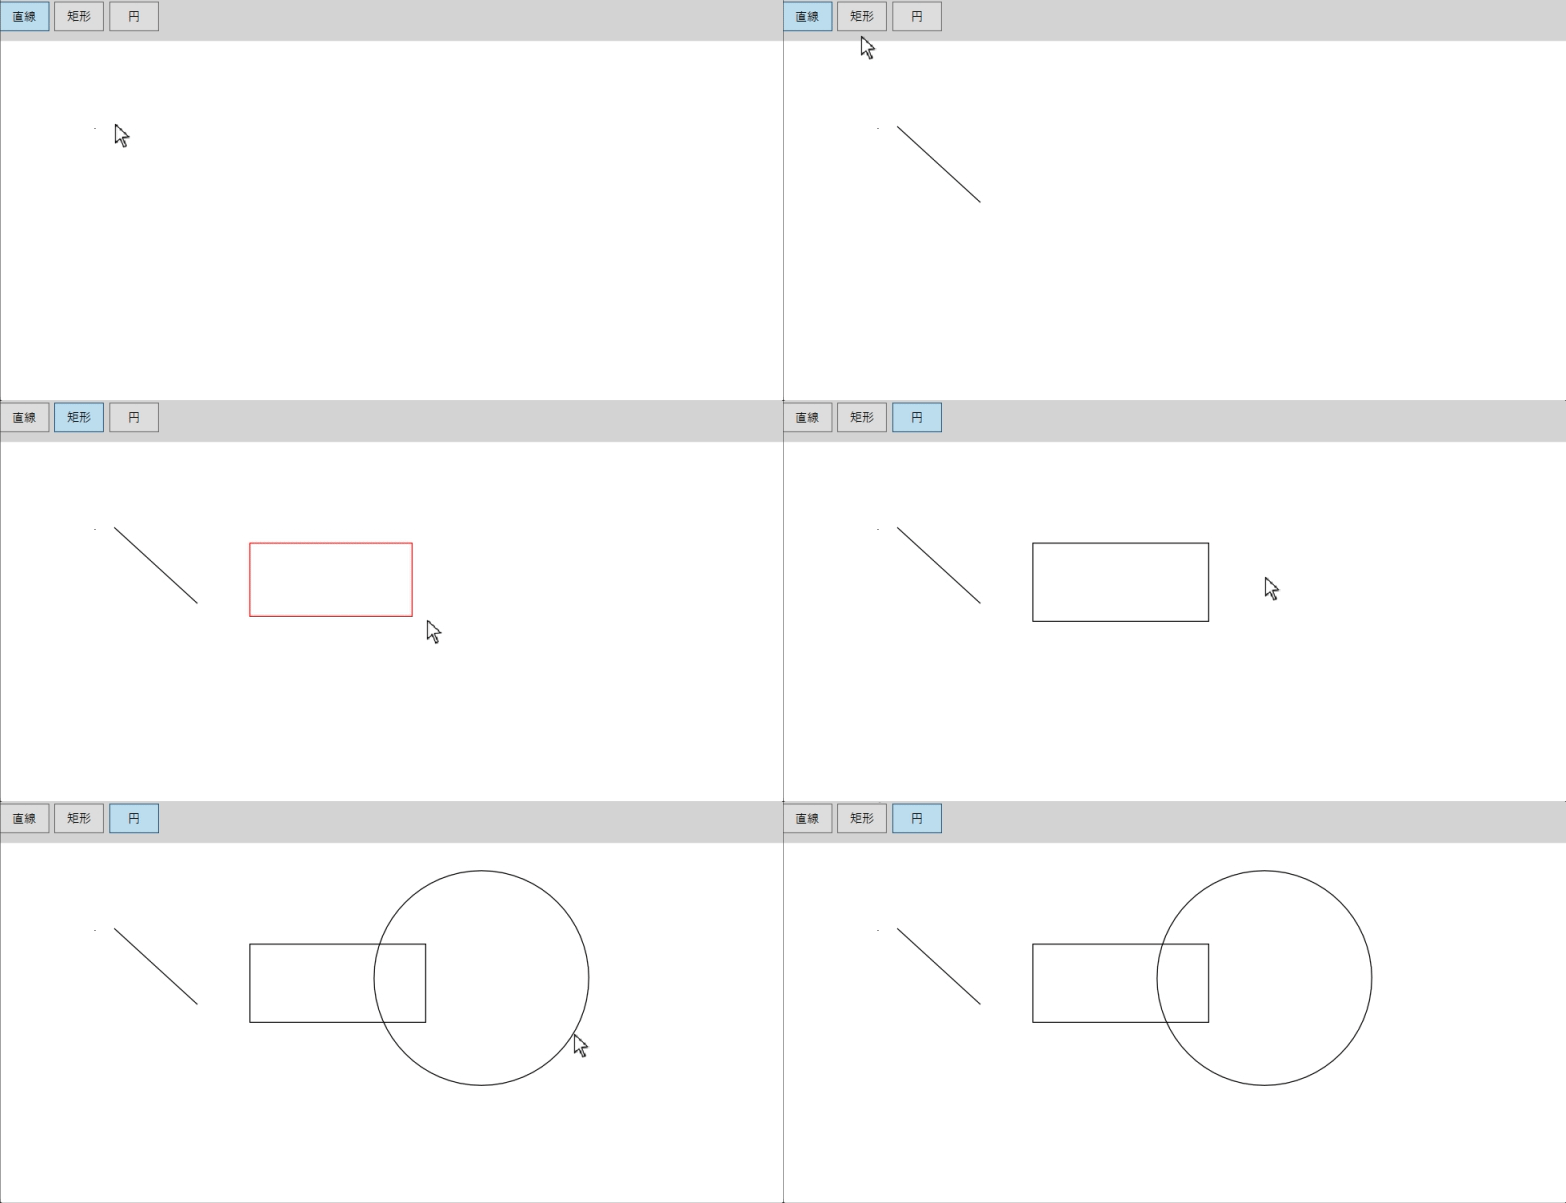
この記事では、前回構築した開発環境を活用して、CADプログラムにおける基本的な図形描画機能を実装します。具体的には、ユーザーがマウス操作で直線、矩形、円を描画できるようにします。
今回のゴール
- マウス操作で描画を開始する。
- 描画する図形(直線、矩形と円)の基礎ロジックを作成する。
- WPF の
Canvasを使って図形を画面に表示する。
実行結果:

コードの全体構成
以下は、今回実装するコードの流れです:
- UI設計:キャンバスとツールボタンの追加
- マウス操作による描画の処理を追加
- 直線、矩形と円の描画切り替え機能を実装
1. 必要なクラスを定義する
Models フォルダに以下の2つのファイルを追加します:
Converts.cs
値変換を行うユーティリティクラスを定義します。
using System;
using System.Globalization;
using System.Windows.Data;

namespace HiCad.Models
{
    /// <summary>
    /// EnumからBooleanに変換
    /// </summary>
    public class EnumToBooleanConverter : IValueConverter
    {
        public object Convert(object value, Type targetType, object parameter, CultureInfo culture)
        {
            if (value == null || parameter == null)
                return false;

            if (!value.GetType().IsEnum)
                throw new ArgumentException("Value must be an Enum.");

            string enumValue = value.ToString();
            string targetValue = parameter.ToString();

            return enumValue.Equals(targetValue, StringComparison.OrdinalIgnoreCase);
        }

        public object ConvertBack(object value, Type targetType, object parameter, CultureInfo culture)
        {
            if (parameter == null)
                throw new ArgumentNullException(nameof(parameter));

            if (!(value is bool booleanValue))
                throw new ArgumentException("Value must be a Boolean.");

            if (booleanValue && targetType.IsEnum)
            {
                return Enum.Parse(targetType, parameter.ToString());
            }

            return Binding.DoNothing;
        }
    }
}
Enums.cs
アプリケーションで使用する列挙型を管理します。
using System;
using System.Collections.Generic;
using System.Linq;
using System.Text;
using System.Threading.Tasks;

namespace HiCad.Models
{
    /// <summary>
    /// ツール タイプ
    /// </summary>
    public enum DrawToolType : byte
    {
        /// <summary>
        /// 線
        /// </summary>
        Line,

        /// <summary>
        /// 矩形
        /// </summary>
        Rectangle,

        /// <summary>
        /// 円
        /// </summary>
        Circle
    }
}
ViewModels フォルダに以下の2つのファイルを追加します:
ViewModelBase.cs
ViewModelBase クラスは、全てのViewModelクラスの基盤となるクラスです。プロパティ変更通知機能を提供するため、INotifyPropertyChanged インターフェイスを実装します。
using System;
using System.Collections.Generic;
using System.ComponentModel;
using System.Linq;
using System.Text;
using System.Threading.Tasks;

namespace HiCad.ViewModels
{
    public class ViewModelBase : INotifyPropertyChanged
    {
        public event PropertyChangedEventHandler? PropertyChanged;

        public void OnPropertyChanged(string proname)
        {
            PropertyChanged?.Invoke(this, new PropertyChangedEventArgs(proname));
        }

        protected bool SetProperty<T>(ref T storage, T value, string propertyName = null)
        {
            if (Equals(storage, value)) return false;
            storage = value;
            OnPropertyChanged(propertyName);
            return true;
        }
    }
}
HiCadViewModel.cs
このクラスは図形描画に関連するプロパティやロジックを管理します。
using HiCad.Models;

namespace HiCad.ViewModels
{
    internal class HiCadViewModel : ViewModelBase
    {
        public DrawToolType ToolType
        {
            get => _drawToolType;
            set => SetProperty(ref _drawToolType, value, nameof(ToolType));
        }
        DrawToolType _drawToolType;
    }
}
2. UI設計:キャンバスとツールボタンの追加
まずは、UIを少し拡張して、描画用キャンバスとツール切り替えボタンを追加します。
MainWindow.xaml の編集:
以下のコードを Grid 内に記述します:
<Window x:Class="HiCad.MainWindow"
        xmlns="http://schemas.microsoft.com/winfx/2006/xaml/presentation"
        xmlns:x="http://schemas.microsoft.com/winfx/2006/xaml"
        xmlns:d="http://schemas.microsoft.com/expression/blend/2008"
        xmlns:mc="http://schemas.openxmlformats.org/markup-compatibility/2006"
        xmlns:local="clr-namespace:HiCad.Models"
        mc:Ignorable="d"
        Title="HiCad" Height="450" Width="800">
    <Grid>
        <Grid.Resources>
            <Style TargetType="ToggleButton">
                <Setter Property="Width"  Value="50"/>
                <Setter Property="Height"  Value="30"/>
                <Setter Property="Margin"  Value="0,0,5,0"/>
            </Style>
            <local:EnumToBooleanConverter x:Key="EnumToBoolean"/>
        </Grid.Resources>
        <Grid.RowDefinitions>
            <RowDefinition Height="Auto"/>
            <RowDefinition />
        </Grid.RowDefinitions>
        <!-- ツールボタンを配置 -->
        <StackPanel Height="50" Orientation="Horizontal" Background="LightGray">
            <ToggleButton Content="直線" IsChecked="{Binding ToolType, Mode=TwoWay, Converter={StaticResource EnumToBoolean}, ConverterParameter=Line}" />
            <ToggleButton Content="矩形"  IsChecked="{Binding ToolType, Mode=TwoWay, Converter={StaticResource EnumToBoolean}, ConverterParameter=Rectangle}" />
            <ToggleButton Content="円" IsChecked="{Binding ToolType, Mode=TwoWay, Converter={StaticResource EnumToBoolean}, ConverterParameter=Circle}" />
        </StackPanel>
        <!-- 描画用キャンバス -->
        <Canvas Name="DrawingCanvas" Background="White" MouseLeftButtonDown="Canvas_MouseLeftButtonDown" MouseMove="Canvas_MouseMove" Grid.Row="1"/>
    </Grid>
</Window>
解説:
- StackPanel: ツールボタンを水平に配置。
- Canvas: 図形を描画する領域を提供します。
- ToolTypeをEnumで定義、各ツールボタンのチェック状態にバインドします
- EnumToBooleanConverterクラスはEnumからBooleanに変換処理を行います。
3. マウス操作による描画の処理を追加
MainWindow.xaml.cs に、マウス操作イベントの処理を追加します。
変更内容:
以下のコードを MainWindow クラス内に記述してください:
using HiCad.Models;
using HiCad.ViewModels;
using System;
using System.Collections.Generic;
using System.Linq;
using System.Runtime.CompilerServices;
using System.Text;
using System.Threading.Tasks;
using System.Windows;
using System.Windows.Controls;
using System.Windows.Data;
using System.Windows.Documents;
using System.Windows.Input;
using System.Windows.Media;
using System.Windows.Media.Imaging;
using System.Windows.Navigation;
using System.Windows.Shapes;

namespace HiCad
{
    /// <summary>
    /// Interaction logic for MainWindow.xaml
    /// </summary>
    public partial class MainWindow : Window
    {
        HiCadViewModel _hiCadViewModel;
        private Shape _currentShape; // 現在描画中の図形

        List<Point> _points = new List<Point>(); // 描画中の座標

        public MainWindow()
        {
            InitializeComponent();

            this.DataContext = _hiCadViewModel = new HiCadViewModel();
        }

        // マウスボタン押下時の処理
        private void Canvas_MouseLeftButtonDown(object sender, MouseButtonEventArgs e)
        {
            _points.Add(e.GetPosition(DrawingCanvas));
            if (_points.Count == 2) // 2点で描画完了
            {
                this.endDraw();
            }
        }

        private void endDraw()
        {
            if (_currentShape != null)
            {
                this.DrawingCanvas.Children.Remove(_currentShape);
                _currentShape = null;
            }

            var shape = this.createShape(_points, Brushes.Black);
            if (shape != null)
            {
                this.DrawingCanvas.Children.Add(shape);
            }

            this._points.Clear();
        }

        /// <summary>
        /// 図形作成
        /// </summary>
        /// <param name="point"></param>
        /// <param name="brush"></param>
        /// <returns></returns>
        private Shape createShape(List<Point> pointlist, SolidColorBrush brush)
        {
            Shape shape = null;

            if(pointlist.Count != 2)
            {
                return shape;
            }

            // ツールに応じた図形を作成
            if (this._hiCadViewModel.ToolType == DrawToolType.Line)
            {
                var line = new Line
                {
                    Stroke = brush,
                    StrokeThickness = 1,
                    X1 = pointlist[0].X,
                    Y1 = pointlist[0].Y,
                    X2 = pointlist[1].X,
                    Y2 = pointlist[1].Y
                };

                shape = line;
            }
            else if (this._hiCadViewModel.ToolType == DrawToolType.Rectangle)
            {
                var rect = new Rectangle
                {
                    Stroke = brush,
                    StrokeThickness = 1,
                    Fill = Brushes.Transparent,
                };

                double width = Math.Abs(pointlist[0].X - pointlist[1].X);
                double height = Math.Abs(pointlist[0].Y - pointlist[1].Y);
                rect.Width = width;
                rect.Height = height;

                Canvas.SetLeft(rect, Math.Min(pointlist[0].X, pointlist[1].X));
                Canvas.SetTop(rect, Math.Min(pointlist[0].Y, pointlist[1].Y));

                shape = rect;
            }
            else // 円
            {
                Ellipse ellipse = new Ellipse()
                {
                    Stroke = brush,
                    StrokeThickness = 1,
                    Fill = Brushes.Transparent,
                };
                double x = Math.Abs(pointlist[0].X - pointlist[1].X);
                double y = Math.Abs(pointlist[0].Y - pointlist[1].Y);
                double r = Math.Sqrt(x * x + y * y);
                ellipse.Width = r * 2;
                ellipse.Height = r * 2;

                double left = Math.Min(pointlist[0].X, pointlist[1].X) - r;
                double top = Math.Min(pointlist[0].Y, pointlist[1].Y) - r;
                Canvas.SetLeft(ellipse, left);
                Canvas.SetTop(ellipse, top);
                shape = ellipse;
            }

            return shape;
        }

        /// <summary>
        /// 描画中
        /// </summary>
        /// <param name="endpoint"></param>
        private void drawing(Point endpoint)
        {
            if (_currentShape != null)
            {
                this.DrawingCanvas.Children.Remove(_currentShape);
            }

            List<Point> points = new List<Point>(_points);
            points.Add(endpoint);

            _currentShape = this.createShape(points , Brushes.Red);
            if(_currentShape != null)
            {
                _currentShape.IsHitTestVisible = false; // MouseLeftButtonDownイベントハンドルされないようにIsHitTestVisibleをfalseにセットする
                this.DrawingCanvas.Children.Add(_currentShape);
            }
        }

        // マウス移動時の処理
        private void Canvas_MouseMove(object sender, MouseEventArgs e)
        {
            if(_points.Count == 1)
            {
                this.drawing(e.GetPosition(this.DrawingCanvas));
            }
        }

    }
}
解説:
- マウスイベントの登録
MouseLeftButtonDown: 図形の描画点を取得、一回目は図形描画開始、二回目図形描画を確定MouseMove: マウス移動に合わせて図形を更新。- 図形未確定の状態は赤色表示、確定したら黒色表示
- _hiCadViewModelの役割
ボタンで選択した状態(ToolType)の持ちます。 - Canvas.SetLeft/SetTop
図形の描画位置を正確に設定するために使用します。
4. 実行結果の確認
プログラムを実行すると以下の操作が可能になります:
- 「直線」ボタンをクリックすると、キャンバス上で直線を描画できます。
- 「矩形」ボタンをクリックすると、矩形を描画できます。
- 「円」ボタンをクリックすると、円を描画できます。
- マウス操作で簡単に図形を作成可能です。

次回の予定
次回の記事では、円弧及び連続図形の作成を実装します。
CADプログラムの基礎はこのように少しずつ進めていくことで確実に身につきます。この記事を参考に、実際にコードを書いて体験してみてください!


コメント